SRX Defense

If you happen to be using a Juniper SRX Firewall to protect your infrastructure, whether it’s located at the outer perimeter of your network or within an inner security zone, there are native attack prevention capabilities called “screens” built into Junos allowing the prevention of basic network layer attacks.  As this is by no means a comprehensive solution or a substitute to protect against sophisticated dos and other advanced layer ¾ attacks, it certainly provides a basic layer of defense from the casual attacker.  There are screen options for IP, TCP, UDP, and ICMP which are typically applied to an “untrust” zone within the configuration of the SRX.  The “untrust” zone is defined as the area that is not to be trusted (how original), such as the public Internet, or other areas of the network that do not have strict policies set.  Out of the box, the SRX sets untrust vs trust zones.

In this review, we will focus on setting common screen options associated with TCP, and we will examine the difference in output from an nmap scan to determine if the target infrastructure has screens enabled or a similar defensive mechanism. 

Configure TCP Screen for Syn-Flood Protection

After logging into the target SRX and changing to configuration mode, you will need to edit the screen for tcp:

1.)  test@srx-fw# edit security screen ids-option screen-config

set tcp syn-flood alarm-threshold 1000
set tcp syn-flood attack-threshold 500
set syn-flood source-threshold 50
set syn-flood destination-threshold 2048
set syn-flood timeout 20

2.)  test@srx-fw# set security zones security-zone untrust screen screen-config

3.)  test@srx-fw# show security screen                            
ids-option untrust-screen {
   tcp {
       syn-flood {
           alarm-threshold 1000;
           attack-threshold 500;
           source-threshold 50;
           destination-threshold 2048;
           timeout 20;
}

4.)  commit

Verifying the presence of a TCP Screen for Syn-Flood Protection

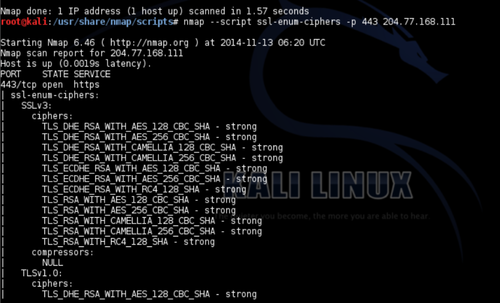
After screen options has been enabled, you should be able to detect the presence of syn flood protection through a standard nmap scan.  Below shows the before and after scenario of when screen options is enabled to protect against a syn-flood.

Before Screen Options Enabled

image

The output above uses the nmap syntax “nmap -v -T5 -A -Pn <target>”.  Notice the host comes back with one port open.

After Screen Options Enabled

image

The output above uses the nmap syntax “nmap -v -T5 -A -Pn <target>”.  Notice the host comes back with multiple ports open.

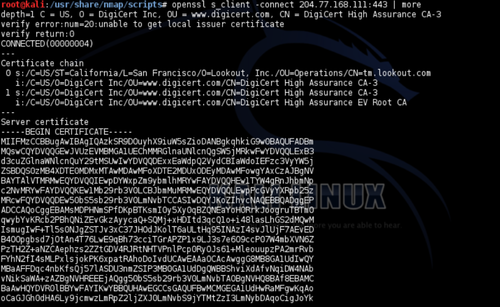
If you telnet to one of these open ports that is different from what was opened when screen options wasn’t configured (tcp port 443), notice we cannot bind to that port.

image

This is due to the screen option we set for a tcp flood above.  It “confuses” the attacker in thinking the port is open, but it is not.

As there are ways to defeat screen options, hopefully this gives you some basic insight as to how to configure screen options and what the diff looks like from an attackers pov.

SSL Nirvana :: Checking the Stack

In the wake of the weaknesses against SSL, such as Poodle and Heartbleed, there was a surge of tools security experts and system engineers used to determine the type of SSL ciphers served by systems supporting SSL (e.g. https, ftps, ssl vpn etc).  The type of tool used is typically based on personal preference, however, some tools are stronger than others.  This article attempts to explore three tools used to discover the ciphers used within implementations of SSL.

Nmap

Nmap is one of the most widely used tools for port scanning.  Aside from discovering open tcp/udp ports on a target system, Nmap provides a rich feature set, including scripts used to decode system/application/protocol versions.  By using the Nmap Scripting Engine (NSE), various scripts can be launched to perform a vast array of networking tasks, such as interrogating the SSLv3/TLS protocol.  Nmap uses the NSE script called “ssl-enum-ciphers” to do a handshake with the SSL protocol to determine its encryption type and associated ciphers. Let’s see how this works.

image

In the example above, we are using the ssl-enum-ciphers nse script to discover the SSL/TLS ciphers available on the target web server noted with “-p 443”.  Notice nmap will list all negotiated ciphers available by the server and it will also compare the ciphers against a list of weak cipher modes to distinguish if the server has a weak cipher mode used.

OpenSSL

OpenSSL contains a strong client command suite to test SSL implementations and interact with the SSL protocol on target servers.  The command line utility is bundled with openssl when installed on a client system.

image

image

In the above example, we are using the s_client SSL/TLS client program to interact with the SSL implementation on the target server.  Based on the server response against tcp port 443, it’s apparent both TLSv1/SSLv3 is being used and the associated cipher/key/strength is shown at ECDHE-RSA-AES128-GCM-SHA256.  As openssl is quick and easy way to determine what SSL stack, it’s output isn’t parsed as nicely as cipherscan and sslscan.

SSLScan

SSLScan is my favorite SSL portscanner (outside of cipherscan, which we are not covering).  It does a great job parsing all of the encryption types, cipher modes, and keys used during the SSL handshake process.  SSLScan, as with these other tools, comes precompiled within Kali and other security distros, but can also be download from github and other repositories.  The output is as follows:

image

image

In the example above, I set the “–no-failed” flag which tells SSLScan not to output any ciphers that have failed in the negotiation process.  This makes it easy to decipher the ciphers supported by the target server and also test specific ciphers to determine if the server has them turned off.  SSLScan is one of the fastest scanners to output all cipher modes, so it is my personal favorite.

Regardless of the SSL Tool you choose to use, always make sure to update the tool with the latest code and never forget to update your SSL version as it’s periodically updated.  Failure to do so may show inaccurate results as the specific SSL libraries may not be present in your client.